- 01. Basic Procedure in Managing Your Webiste
- 02. To Upload a Top Banner to the Website
- 03. To Add a Category to the Webiste
- 04. To Create the Top Menu for the Webiste
- 05. To Add Category "About Us"
- 06. To Add the Contact Page to the Website
- 07. To Add an Article to the Website
- 08. To Insert a Picture into an Article
- 09. To Edit, Delete An Article
- 10. To Add a Category for Photos
- 11. To Add a Slide Show to the Website
- 12. To Edit, Delete a Category
- 13. To Add a Video Clip to the Website
- 14. To Edit While Viewing the Web Pages
- 15. To Change the Display of an Article List
- 16. To Change the Display of an Article
- 17. To Place an Advertisement on the Website
- 18. Display Types for Advertisements
- 19. How To Layout Your Homepage
- 20. To Show, Hide And Edit The Special Boxes
- 21. Search And Filter Tools In The Control Panel
- 22. To Setup Default Sizes For Images
- 23. To Insert a Video Clip Into An Article
- 24. To embed a Youtube Video in your Website
- 25. To Post a Book on Your Website
- 26. To Post a PDF book on the Website
 |
(Download PDF) |
The Search and Filter Tools were not mentioned in the previous articles to keep the instructions short. This article will get you acquainted with these tools.
There are some tools in the Control Panel to help you find a record faster. These tools will be very useful when your website contains a lot of articles.
A list of records will normally appear whenever you choose one of the managing tasks. For example: When you want to manage articles, you go to “Content Manager”; then select “Articles” in the drop down list. You will see a list of records similar to this picture:

This list is arranged in columns and lines. At the top of each column is usually the column title. For example: ID, Title, Posted Date…
2. The Sort Tools
The column titles are actually the sort tools. When you click on a column title, the records will be sorted by that data. When you click on it the second time, the records will be sorted in the reverse order.
- To sort by ID
As default, the list is sorted by ID in reverse order when it first appears. Which means the record with highest ID will appear at top. ID is the number automatically attached to each record when you add a new record to the website. It starts from the smallest number and grows in time. This ID cannot be edited. This tool is useful when you want to find the oldest records or the latest records.
Click on the column title “ID”, the list will be in ascending order. Click on “ID” again, the list will be in the descending order.
- To sort by record title
Click on the column title “Title”, the list will be in normal alphabetical order of the record titles. Click on “Title” again, the list will be in the reverse order (i.e.: from Z to A).
- To sort by Date Posted
Click on the column title “Posted Date”, the list will be in the order of the dates these records were added, the oldest will be at top. Click on “Posted Date” again, the list will be in reverse order.
The Control Panel normally displays a default number of records on each page of a list. If you don’t find the record on the first page, you can go to the next page or any other page.
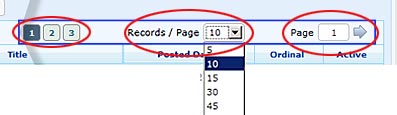
Above the list are several squares with numbers. Click on a number to go to the page you want.
You can decide the number of records to be displayed in a page. Click the box after “Records / Page”; then select a number in the drop down list.
You may go to a specific page by entering a number in the box after “Page”; then click the arrow next to it. You must click the arrow!
4. The Search Tool
Near the upper left corner is the Search Tool. The search tool helps you find a record by some data that you know. The data may be some words in the title or in the description, etc…
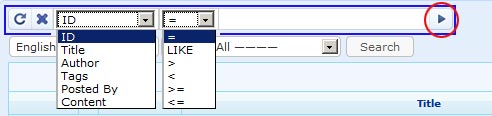
Here’s how to use:
1. Click the first box and choose the type of data based on that you want to search.
2. Click the next box and choose the search method.
- = : records that match. This method is not recommended because you need to fill in the complete data.
- LIKE: records that partially match. This method is preferable because you only need to fill in just a few words.
- > : records that have value larger than. This method is suitable for numerical or dates.
- < : records that have value less than. This method is suitable for numerical or dates.
- >= : records that have value equal or larger than. This method is suitable for numerical or dates.
- <= : records that have value equal or less than. This method is suitable for numerical or dates.
On the left of these boxes there are two buttons which serve the following purposes:
5. The Filter Tool
Right below the “Search Tool” is the “Filter Tool”. You will normally use this tool to limit the list to articles in a specific category. When managing categories, you can use this tool to list only the categories that belong to a “parent” category. This tool is also used to limit records that belong to a language site.
1. To filter by language
You may remember that you are always asked to “select which language site to manage” when you do any managing task. By selecting the language site, you actually limit the list to only records that belong to that language site. After doing so, you will notice that the list contains only records in that language. You will also notice that the list of categories now contains only categories of that language site.

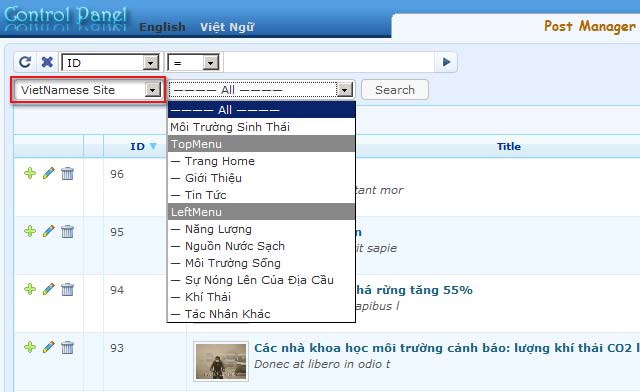
2. To filter articles of a specific category
Next to the “language site box” is the “category filter” box. Click this box and select one category in the drop down list. Then, click the “Search” button. The list will show only the articles in that category. Note: You must click the “Search” button, otherwise the filter tool will not work.
3. To filter categories that belong to a parent category
A “parent” category is a category that contains several sub-categories. For example: “Left Menu” is a parent category which contains all the menu items on the Left Menu. “Top Menu” is the parent category of those categories which appears on the Top Menu.

Suppose you are managing categories and you only want to see the categories that belong to the Left Menu, click “LeftMenu” on the drop down list, The filter box will be filled with “LeftMenu”. Then, click the “Search” button. The list will show only those categories. Note: You must click the “Search” button; otherwise the filter tool will not work.
You’ve just learned the various tools that help you quickly find the record you need in the Control Panel.
Gửi ý kiến của bạn
%7Cutmcsr%3D(referral)%7Cutmcmd%3D(none)%3B%2B__utmv%3D759416420.-%3B)