- 01. Basic Procedure in Managing Your Webiste
- 02. To Upload a Top Banner to the Website
- 03. To Add a Category to the Webiste
- 04. To Create the Top Menu for the Webiste
- 05. To Add Category "About Us"
- 06. To Add the Contact Page to the Website
- 07. To Add an Article to the Website
- 08. To Insert a Picture into an Article
- 09. To Edit, Delete An Article
- 10. To Add a Category for Photos
- 11. To Add a Slide Show to the Website
- 12. To Edit, Delete a Category
- 13. To Add a Video Clip to the Website
- 14. To Edit While Viewing the Web Pages
- 15. To Change the Display of an Article List
- 16. To Change the Display of an Article
- 17. To Place an Advertisement on the Website
- 18. Display Types for Advertisements
- 19. How To Layout Your Homepage
- 20. To Show, Hide And Edit The Special Boxes
- 21. Search And Filter Tools In The Control Panel
- 22. To Setup Default Sizes For Images
- 23. To Insert a Video Clip Into An Article
- 24. To embed a Youtube Video in your Website
- 25. To Post a Book on Your Website
- 26. To Post a PDF book on the Website
 |
(Download PDF) |
Inserting a video clip is as easy as inserting an image into an article. In such case, a preview image will appear at the place where you insert the video. It is ready for the visitor to start playing.

In this example, you will insert a video clip into the article “History of Radio” in the English site. The video clip is “The birth of the radio age-1920s”, which is a flash movie (FLV format).
Here’s how to do it:
A. Login the Control Panel as usual.
B. Go to Content Manager in the Top Menu and select “Articles” in the drop down list.
C. Select the language site. If the box near the upper left corner is not showing “English Site”, click the box and select “English Site”.
D. You will see a list of existing article in the English site.
E. Find the article “History of Radio”. Click on the title to open the record.
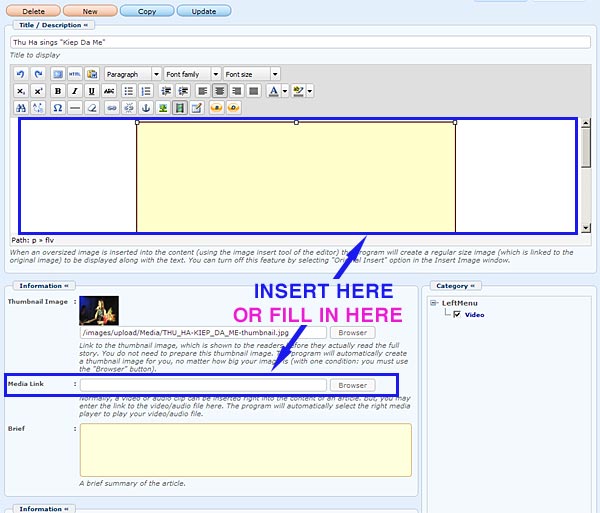
F. Inside the “Description” box, find the place where you want to insert the video clip. In this example, we will insert the video at the end of the article.
G. Click on an empty line below the article. If there is no empty line, click at the last character of the article, then hit the “Enter” key to add an empty line.
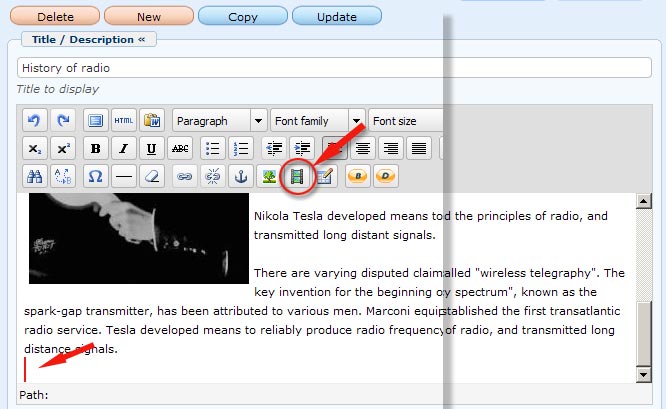
H. Click the icon for “Insert/Edit Embedded Media” among the editor’s tools. It is the icon with a film strip. The “Insert Media” window will appear.

I. Click the icon at the end of the “File/URL” box. You will see the files and folders in the web server.
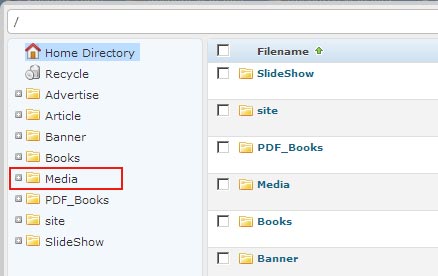
J. Since you are posting a video clip, you should upload it into the “Media” folder. Click on the folder named “Media”. You will see the existing video files on the right of this screen.
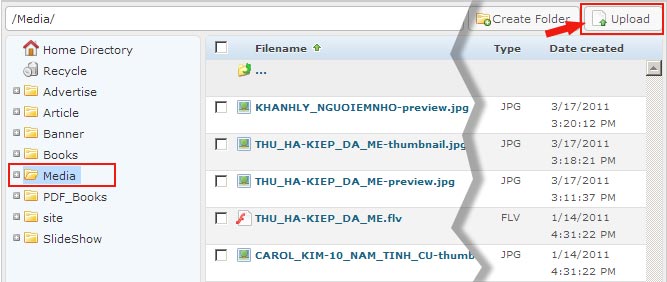
K. Click the “Upload” button at the upper right corner. The “Upload” screen will appear.
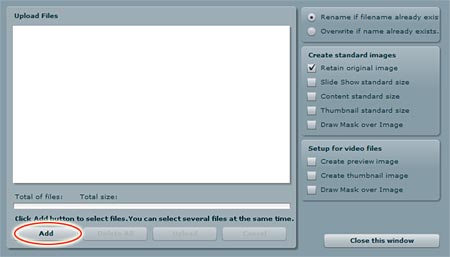
L. Click the “Add” button. You will see the files in your computer.
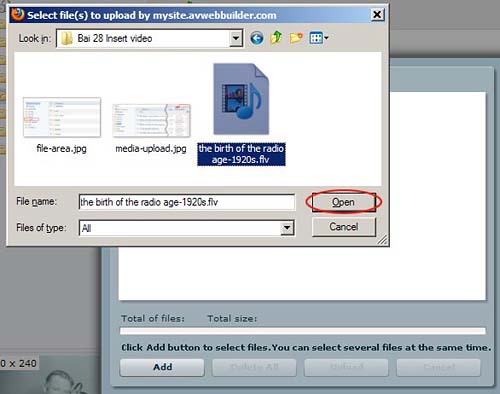
M. Find the video file you want to upload.
N. Click on the filename. Then, click the “Open” button near the lower right corner.
O. You will be back to the “Upload” screen. This time, the video file will appear near the top of this screen.
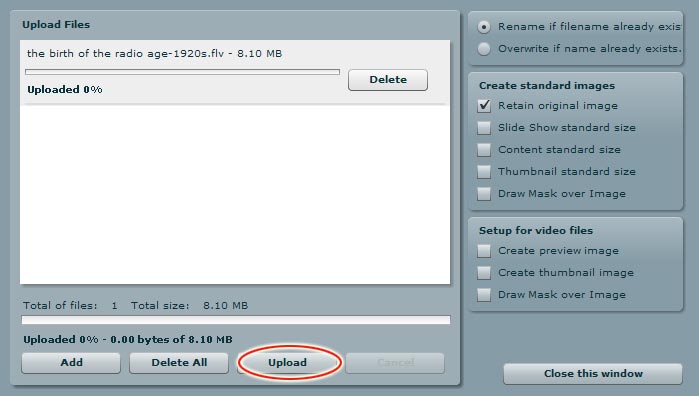
P. Click the “Upload” button.
Q. When the file transfer is completed, the message “All files have been uploaded” will appear. Click “OK”.
R. Click the “Close this window” button.
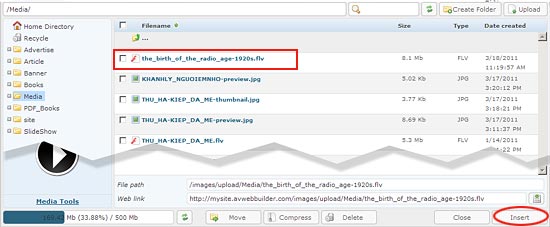
S. You will be asked to confirm. Click “Yes”. You will be back to the folder “Media” of the server and the file you’ve just uploaded will appear in the list.
T. Click on the filename. Then, click the “Insert” button at the lower right corner.
U. You are back to the “Insert Media” screen. The “File/URL” box is now filled with the path to the video file.
V. Do not concern about the “Type” box. This box only shows the video format of this file.
W. If you’ve just uploaded a flash video, you will need to display a preview image of the video. Here’s how to do it.
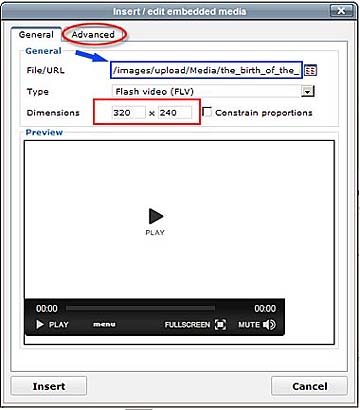
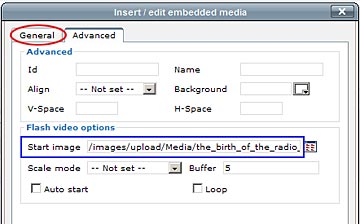
- Click the “Advanced” tab. The screen will look like this.
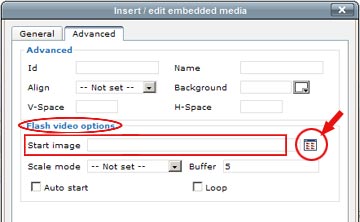
- Find the “Start Image” box in the “Flash video options”. Click the icon at the end of the box.
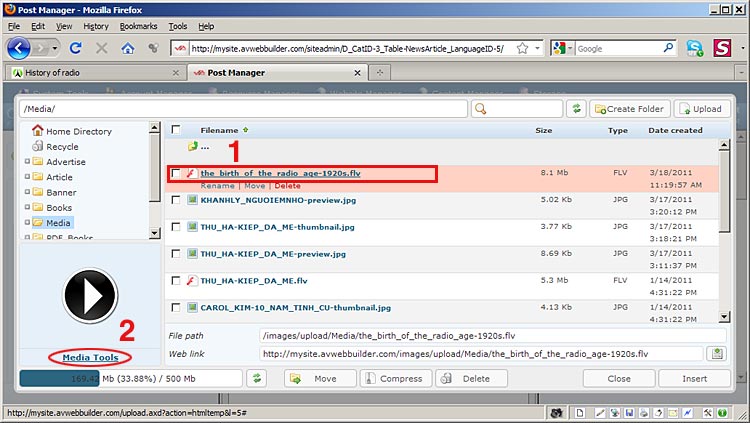
- Find the flash video file you’ve just uploaded. Click on it.
- Look at the lower left corner, you will find a button named “Media Tools”. Click on “Media Tools”. A screen like this will appear.
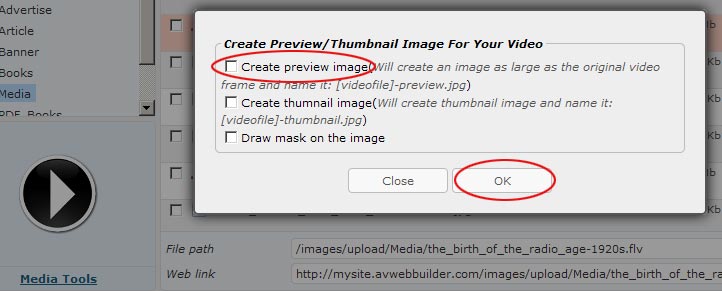
- Click the box on the top line.
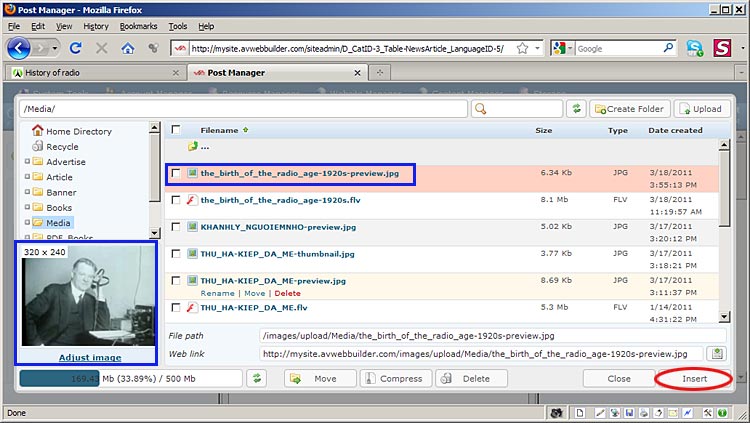
- Click the “OK” button. You will be back to the list of files in the “Media” folder. This time, a new image file (JPG format) has been created. The filename is similar to video file with an extra part “-preview”. This file is being highlighted with a red background and the image of this file is shown at the lower left corner.
- Click the “Insert” button at the lower right corner. You will be back to the “Insert Media” screen and the path to the file has been filled in the “Start Image” box.
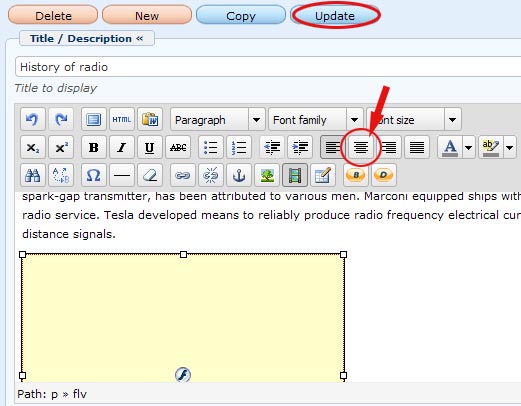
- Click the “General” tab to see the “Insert Media” first screen. The “Preview” box is now showing the preview image you’ve just created.
- Click the “Insert” button. You will be back to the article record. A light yellow frame will now appear at the position where you’ve inserted the video file.
- Let’s move the video to the center of the column.
- Click the light yellow frame to select it. There will be 8 small squares around this frame.
- Click the icon for “align center” in the tool box. The light yellow frame will be moved toward the center of the text.
- Finally, click the “Update” button.
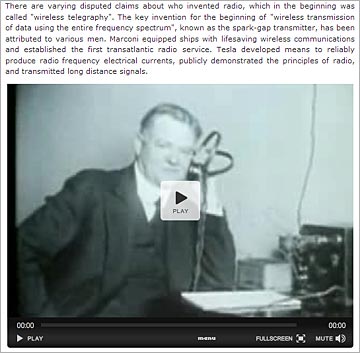
- Go to your website to check if the video has been added to the end of this article. You may need to click the “Refresh” button to update this web page. Your web page will look similar to this.


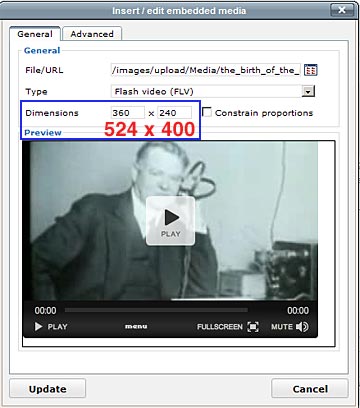
X. Your video can be viewed with a larger size than the original. Let’s make the video screen as large as the column width, which is 524 pixels, similar to this.
Y. Here’s how to do it (suppose your video is a flash video).
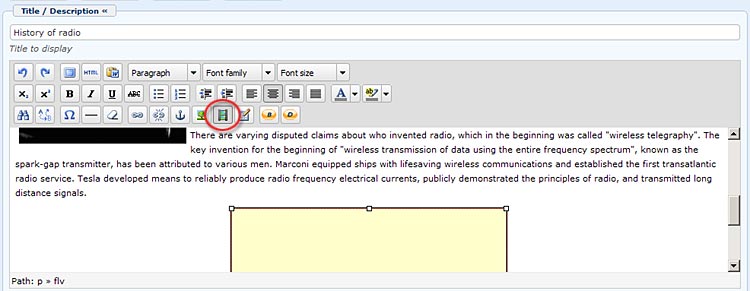
- You need to be back to the Control Panel and open the article record that you’ve just inserted the video clip.
- Click the light yellow frame to select this video. Eight small squares will appear around this frame.
- Click the “Insert Media” icon in the tool box. The “Insert Media” screen will appear.
- Change the data in the “Dimensions” boxes to 524 x 400. You still need to do some more steps.
- Do not concern about the “Constrain proportion” box.
- Click the “Advanced” tab. The screen will look like this.
- Click the “Scale mode” box and select “full display”.

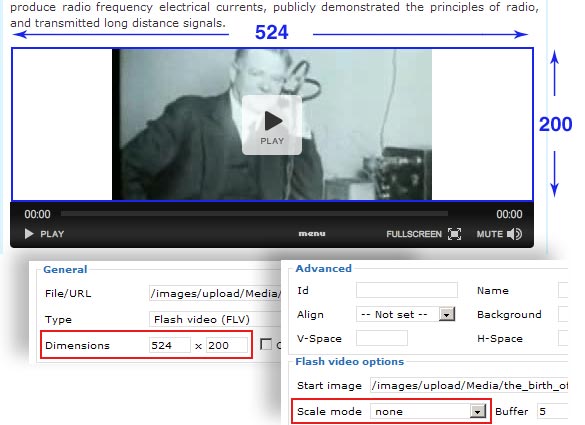
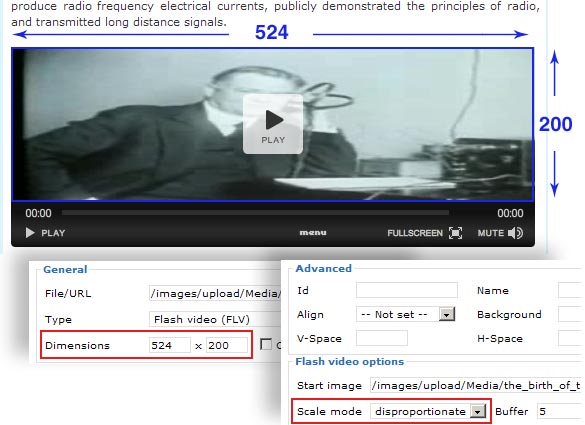
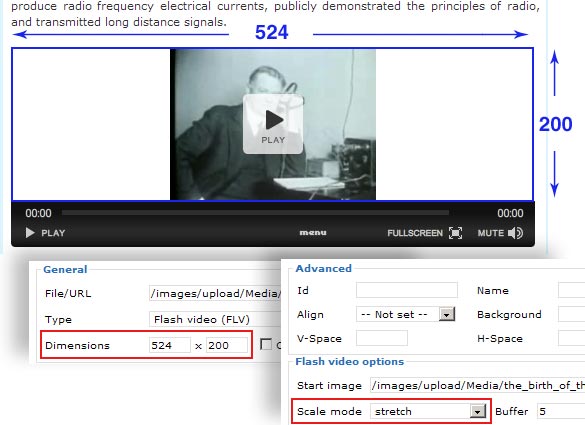
NOTES: Following are the results of different scale modes. We use the dimensions “524 x 200” to demonstrate these results more clearly. In reality, you should choose dimensions proportional to the original video size.
- None. The video will not be resized. If the specified dimension is larger than the original video, the extra space is filled with white. If the specified dimension is smaller than the original video, it will be cropped.
- Disproportionate. The video will be enlarged (or reduced) on both sides to fit the specified dimensions. The result is a distorted video.
- Stretch. The video is enlarged (or reduced) until one side is equal the specified dimension and the other side is smaller than the specified dimension. The unfit side is filled with white.
- Full display. The video is enlarged (or reduced) on both sides until one side is equal the specified dimension and the other side will be larger than the specified dimension. The larger side will be cropped to the specified dimension.
- Do not concern about the other boxes in the “Advanced” tab.
- Click the “Insert” button to finish. The “Insert Media” screen will be closed.
- Click the “Update” button of the article record to save the changes.
- Go to your website to check if the video has been enlarged to fit the whole column. You must refresh the web page to see the changes you’ve just made.

Gửi ý kiến của bạn
%7Cutmcsr%3D(referral)%7Cutmcmd%3D(none)%3B%2B__utmv%3D970229088.-%3B)