- 01. Basic Procedure in Managing Your Webiste
- 02. To Upload a Top Banner to the Website
- 03. To Add a Category to the Webiste
- 04. To Create the Top Menu for the Webiste
- 05. To Add Category "About Us"
- 06. To Add the Contact Page to the Website
- 07. To Add an Article to the Website
- 08. To Insert a Picture into an Article
- 09. To Edit, Delete An Article
- 10. To Add a Category for Photos
- 11. To Add a Slide Show to the Website
- 12. To Edit, Delete a Category
- 13. To Add a Video Clip to the Website
- 14. To Edit While Viewing the Web Pages
- 15. To Change the Display of an Article List
- 16. To Change the Display of an Article
- 17. To Place an Advertisement on the Website
- 18. Display Types for Advertisements
- 19. How To Layout Your Homepage
- 20. To Show, Hide And Edit The Special Boxes
- 21. Search And Filter Tools In The Control Panel
- 22. To Setup Default Sizes For Images
- 23. To Insert a Video Clip Into An Article
- 24. To embed a Youtube Video in your Website
- 25. To Post a Book on Your Website
- 26. To Post a PDF book on the Website
 |
(Download PDF) |
You’ve already known that you don’t need to prepare your pictures to a specific size before uploading it to the website. The Control Panel has a built-in function to resize your picture to the predetermined sizes. Your website already comes with some default sizes; but you can change them to suit your needs.
If you want to change these default sizes, do as follow.
1. Login the Control Panel. Go to “System Tools” on the Top Menu and select “Website Configuration” in the drop down list.

2. Then, click “Image Setting” on the left panel. You will see a page with current default sizes on the right. Regular image is the image that is displayed along with an article.
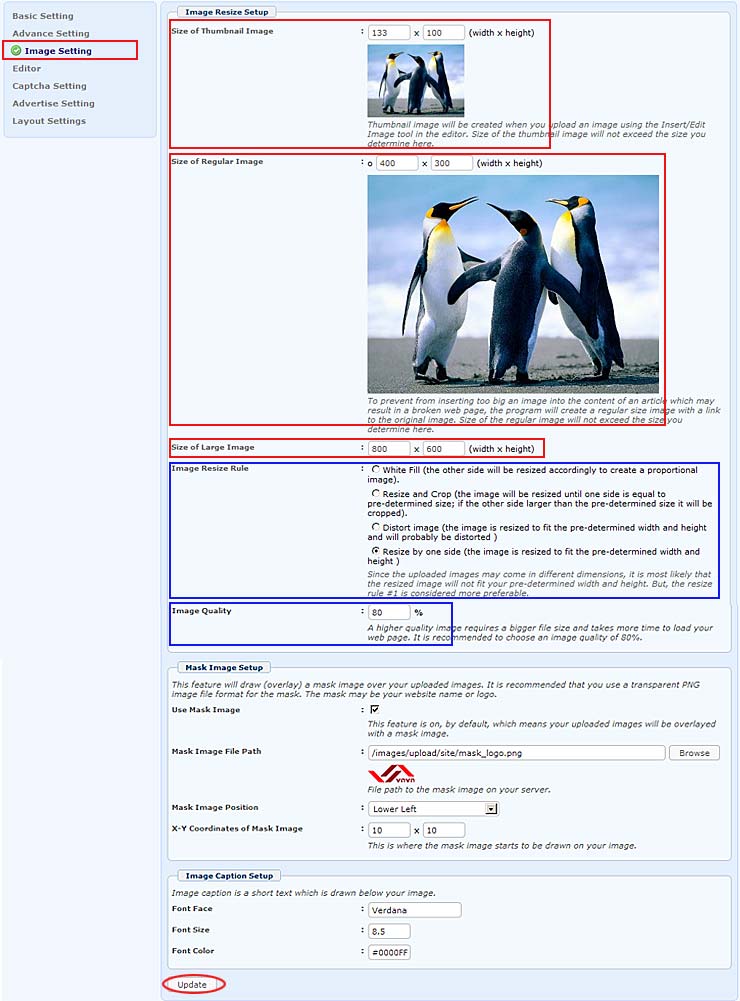
3. On the same line with “Size of Thumbnail Image”, change the default size of the thumbnail image as necessary.
4. On the same line with “Size of Regular Image”, change the default size of the regular image as necessary.
5. On the same line with “Size of Large Image”, change the default size of the large image as necessary. This large image will be displayed when a viewer clicks on the regular image in the article.
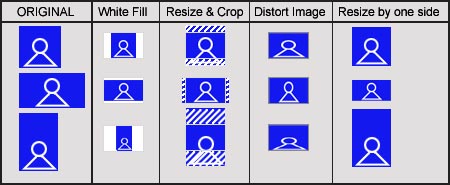
6. In the “Image Resize Rule” section, you can select one of the 4 rules to resize the image:
- White Fill. The image will be resized until one side fits and the other side is less than fit. The unfit area will be filled with white color.
- Resize & Crop. The image will be resized until one side fits and the other side is still larger than fit. That side will then be cropped to fit the predetermined size.
- Distort Image. Both sides of the image are resized to fit the predetermined size. The resulting image will be distorted.
- Resize by one side. The image is resized based on the side you want to fit. The other side may be smaller or larger than the predetermined size.
The following table shows you how the resulting image will look like if you use one of the 4 resizing rules.
Other than setting up the default image sizes, here you can also setup the image mask function and the text size of the image caption.
8. If you want your logo to appear on all your images, you can setup to do so in the “Mask Image Setup” section.
- Use Mask Image. Check this box if you want to use this function.
- Mask Image File Path. Fill in the path to the mask image in the web server. You can click the “Browse” button to upload the mask image similar to the way you insert an image into an article. NOTE: You should prepare an image with a transparent background in the PNG file format.
- Mask Image Position. Click this box and select one of the positions in the drop down list.
- X-Y Coordinates of Mask Image. Enter the starting coordinates where the mask image will start to be drawn on the image.
- Font Face. Enter the font name you want to use for the caption text.
- Font Size. Enter the size you want for the caption text.
- Font Color. Fill in a hexadecimal code of the color you want for the caption text. The color code must start with a “#” sign and 6 alphanumeric characters.
NOTE: We do not mention the default size for slide images in this article because you will determine the size when you are uploading them.
You’ve just learned how to setup default sizes for images in your web site.
Gửi ý kiến của bạn
%7Cutmcsr%3D(direct)%7Cutmcmd%3D(none)%3B%2B__utmv%3D521522873.-%3B)