- 01. Basic Procedure in Managing Your Webiste
- 02. To Upload a Top Banner to the Website
- 03. To Add a Category to the Webiste
- 04. To Create the Top Menu for the Webiste
- 05. To Add Category "About Us"
- 06. To Add the Contact Page to the Website
- 07. To Add an Article to the Website
- 08. To Insert a Picture into an Article
- 09. To Edit, Delete An Article
- 10. To Add a Category for Photos
- 11. To Add a Slide Show to the Website
- 12. To Edit, Delete a Category
- 13. To Add a Video Clip to the Website
- 14. To Edit While Viewing the Web Pages
- 15. To Change the Display of an Article List
- 16. To Change the Display of an Article
- 17. To Place an Advertisement on the Website
- 18. Display Types for Advertisements
- 19. How To Layout Your Homepage
- 20. To Show, Hide And Edit The Special Boxes
- 21. Search And Filter Tools In The Control Panel
- 22. To Setup Default Sizes For Images
- 23. To Insert a Video Clip Into An Article
- 24. To embed a Youtube Video in your Website
- 25. To Post a Book on Your Website
- 26. To Post a PDF book on the Website
 |
(Download PDF) |
Home page is the first page a visitor will see when he visits your website. It is like the front of a shop. There are many ways to layout your homepage. To layout your homepage you will first select a page interface. Then, decide what content and how it will be displayed on the homepage.
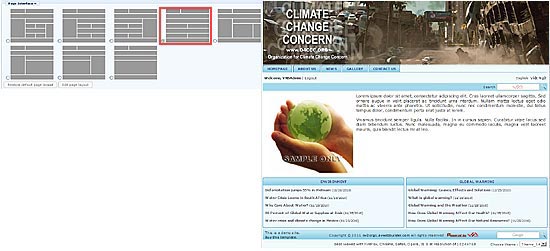
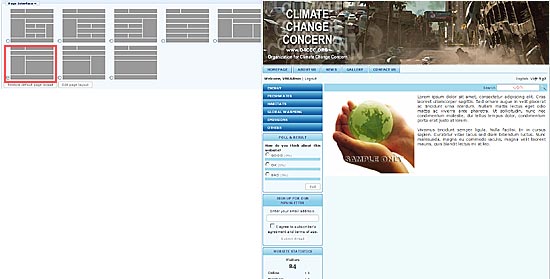
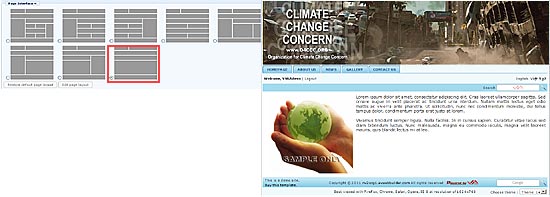
Page Interface
Homepage is a category by itself. And, you’ve already known that you must select a page interface for a category. The category record has a section which shows the available page interfaces like the following.
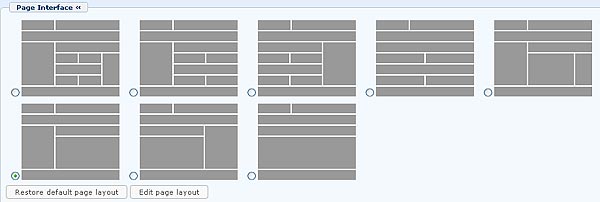
You may select any of the 8 available interfaces for your homepage. Spend enough time to think before you pick an interface. This must be done before you add the content to it. If you change the page interface after you have added the content, the homepage might not look right.
The page interface is the arrangement of columns of the webpages of a category. The center column of some interfaces contains 2 extra elements. These elements are normally boxes of headlines (or titles). The following pictures show these page interfaces and how they look on the actual web pages.
Page Interface 1
Page Interface 2
Page Interface 3
Page Interface 4
Page Interface 5
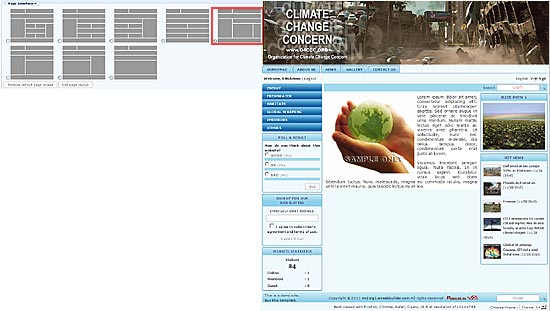
Page Interface 6
Page Interface 7

Page Interface 8
To layout out your Homepage, you must first select one of the above interfaces. Next, you will decide which content to be shown and it is presented.
Layouts of a Homepage
Following are some common layouts for a homepage:
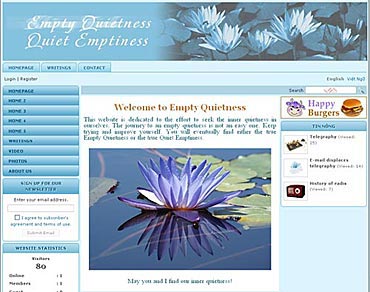
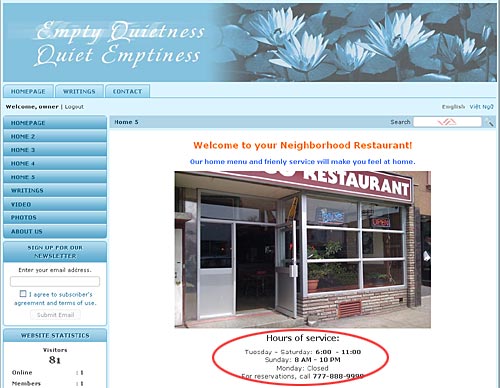
- A short introduction of your business or organization. You may include some pictures of products or activities of your organization. In case of a shop, a restaurant, or a medical office , the Homepage may be used to post your business hours…
- Or, some latest postings from the “News” or “Articles” category.
- Or, a slide show of products or activities of your organization.
- Or, some highlights about your products or activities.
In this article, you will practice doing some homepage layouts. What you learn here will help you in creating your own homepage. If you know how to utilize the functions of your website, you may create a layout that is quite different from the following examples.
You will use “Page Interface 1” for the first three examples and “Page Interface 6” for the 4th example.
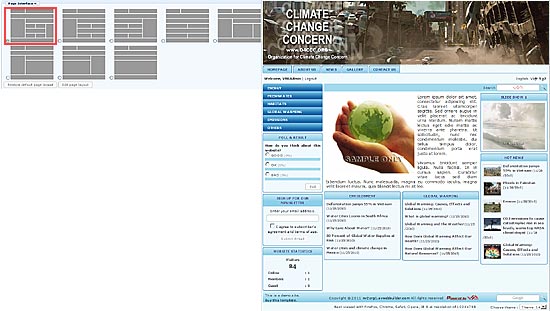
Layout 1
Requirements:
- Prepare an article. You must prepare a short article that tells about your business or organization. A welcoming sentence or the mission statement of your business or organization may be used here.
- Prepare your pictures. If some pictures will be included here, you must select the best pictures possible and resize them to fit the space. The pictures should not be too large or too small. If you use the 3 column interface, the pictures must be 544 pixels wide or less. If you use the 2 column interface, the pictures must be 786 pixels wide or less.
Here’s how to do it:
1. Change the category data.
- Login the Control Panel. Go to “Website Manager” on the Top Menu; then select “Categories” in the drop down list.
- Find the “Homepage” category that belongs to the Left Menu. (This is the main category when it was added to the website. The “Homepage” category on the Top Menu is only a link category). Click on “Homepage” to open its record.
- If “Homepage” is the current Content Type of this category, please change it to “One page”.
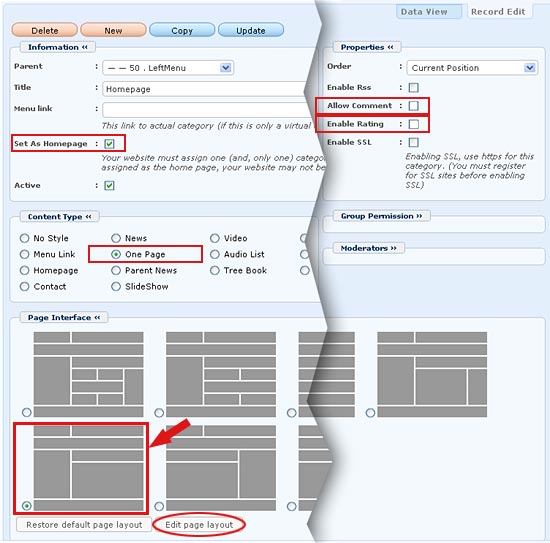
- Check the box on the same line with “Set As Homepage”.
- Uncheck the “Allow Comment” and “Enable Rating” boxes so that the Comment box will not appear on the Homepage.
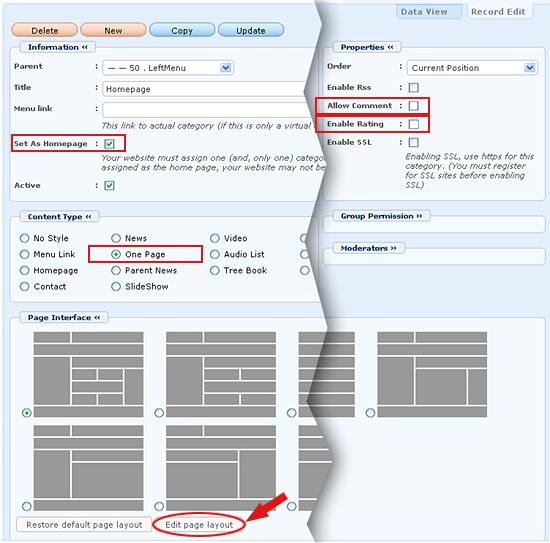
- You will also need to turn off the PDF, Print, Email icons as well as other elements that are normally displayed with an article. To turn off these elements, you need to go to the “Page Interface” section and click the “Edit page layout” button.
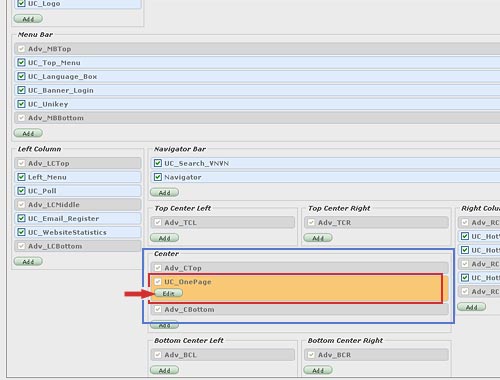
You will enter a screen that shows different sections of your web page. Go to the “Center” section and click on “UC_OnePage”. This element will become orange and an “Edit” button will appear. Click the “Edit” button. A small screen will appear.

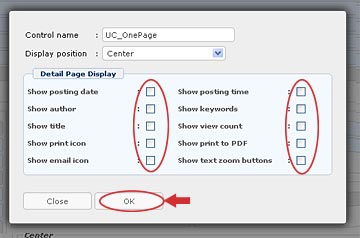
Leave the first 2 boxes as is. In the “Detail Page Display” section, uncheck all the boxes in this table. Click “OK” to accept the changes. You will be back to the “Edit page layout”.
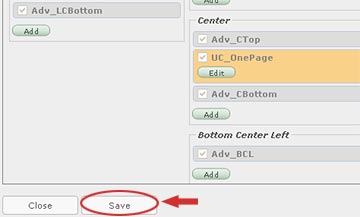
Click the “Save” button.

Finally, click the “Update” button of the category record.

- You have just changed the category so that it does not display unnecessary elements.
Now, let’s add an article and select category “Homepage” for it.
- Go to “Content Manager” on the Top Menu and select “Articles” in the drop down list.
- Click “Record Edit” at the top right corner.
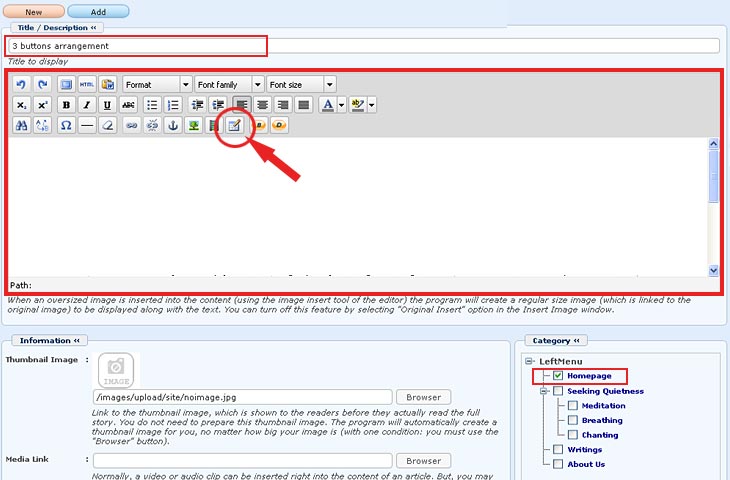
- Fill in a title (this title will not appear on the website because you have turned off the “show title” function). You still need to fill in some text here; otherwise, you will get an error message because it is required.
- In the Category section, check the box for “Homepage".
- Fill in “Description” box with the introduction article. The article can be formatted with the editor tools to make it more pleasing. You can format text similar to the way you would do in Microsoft Word. If you want to show some pictures, you can insert them here.
- Click the “Add” button (or the “Update” button).
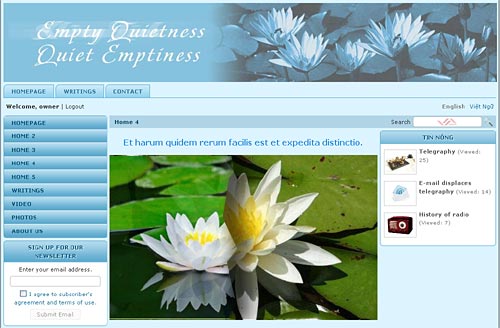
- Go to your website. Click “Homepage” on the Left Menu to see if the homepage already shows your article. Re-edit it until you feel OK with it.
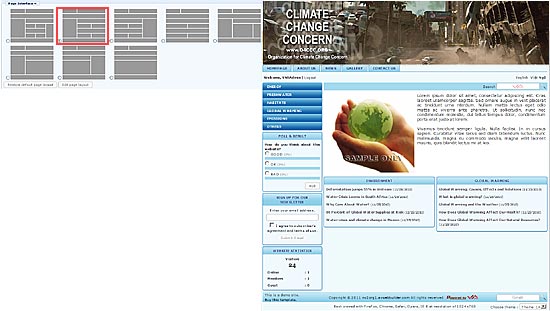
Layout 2
This layout will show a few latest news (or articles) from a specific category.
Requirements:
- The website must have new articles regularly. This layout will let visitors see your new articles at first glance and is suitable for a website that has new postings regularly. You can only select a category to be displayed here. It may be news, articles, slideshow, video, audio, etc.
Here’s how to do it:
This example assumes that your Homepage will show the latest articles in the category “Writings”.
- Login the Control Panel. Go to “Website Manager” on the Top Menu and select “Categories” in the drop down list.
- Find the category “Writings” that belongs to the Left Menu. (Note: you must change the main category. In our example, the one that belongs to the Left Menu is the main category. The one on the Top Menu is only a linked category).
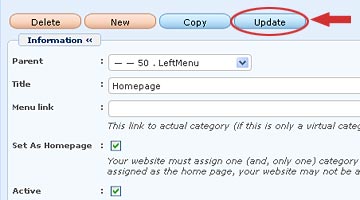
- Check the box on the same line with “Set As Homepage”. NOTE: Only one category can be set as Homepage. Therefore, if another category is currently the homepage, this box will automatically be unchecked in such category.
The category record of “Writings”, after changing, will look like this.
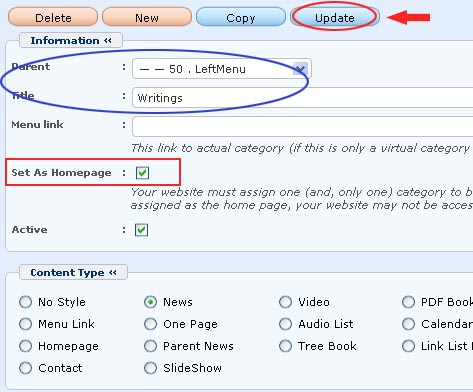
- Click the “Update” button.
- Go to your website. Click “Homepage” on the Left Menu to see if the list of articles is shown on the Homepage.
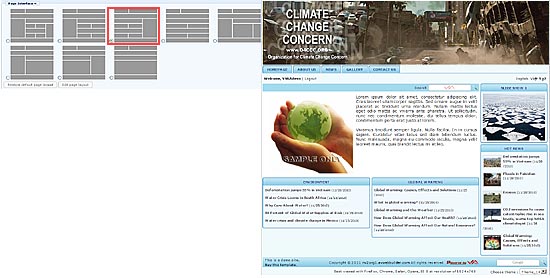
Layout 3
This layout will present some pictures that tell about your business or organization in the form of a slide show.
Requirements:
- Prepare some pictures. You should prepare some pictures of the same size. If your Homepage uses the 3 column interface, the pictures should be 455 pixels wide, or less. If your Homepage uses the 2 column interface the pictures should be 786 pixels wide, or less.
Here’s how to do it:
With this special layout, you will use the advertisement display type to create a slide show. This is the easiest way to get it done.
- Login the Control Panel. Go to “Content Manager” on the Top Menu then select “Advertisement” in the drop down list.
- Click “Record Edit” at the top right corner to add a new “advertisement”.
- Title. FFill in a title that helps you know this picture belongs to the slide show on the Homepage.
- Category. Select “Homepage” as the category that this “advertisement” will appear.
- Advetisement Content.
If you want to have a line of text above (or under) the picture, you can enter it in this box. You can align this text to the center by clicking the text then click the “Align center” icon in the tool box.
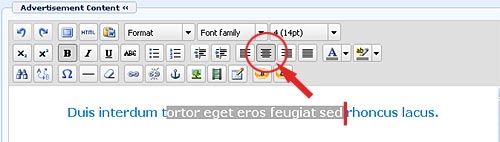
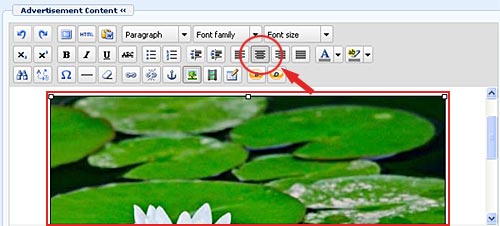
Insert one slide show picture here, similar to the way you would insert an advertisement image. After the image is inserted, you need to align it to the center. Click on the image to select, then click the “Align center” icon in the tool box.
6. In the “Setup Advertise” section
- Check the box for “Never Expires”.
- Check the box for “Random Advertise”.
The advertisement record looks similar to this.
8. Click the “Add” to finish adding this slide picture.
Repeat the above steps for the rest of the pictures in the slide show. In other words, you will add 5 records if your slide show contains 5 pictures.
9. Go to your website. Click “Homepage” on the Left Menu to see if the slide show will appear.
Layout 4
This layout highlights some products or services of your business or organization. In this example, the owner of the website wants to emphasize on the three activities. These three activities may already exist in the Left Menu (or Top Menu) but they are more emphasized in this layout.
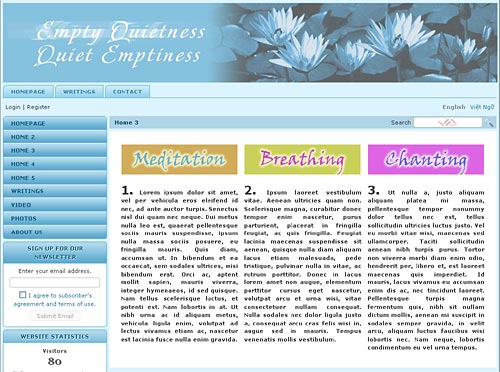
In this example, the homepage shows the 3 items which are the 3 sub-categories hidden in the Left Menu.
Requirements:
- Select the targeted items. Select 3 to 6 items show on the homepage.
- Prepare the banner images for these items.
- Prepare some brief description of these items. This is optional
Here’s how to do it:
This layout is simply an article which contain a table with 3 columns and 2 rows. We will put 3 banners in the top row, and 3 descriptions in the bottom row. Therefore, the Homepage category will use the “One page” content type.
1. Edit the category Homepage
- Go to “Content Manager” on the Top Menu then click “Articles” in the list.
- Open the record of category Homepage.
- Check the box on the same line with “Set as homepage”
- Select “One page” for the Content Type.
- Select a 2 column interface for this category to have enough space for the article.
- Uncheck the “Allow Comment” and “Enable Rating” boxes so that the Comment box and “Ratings” will not appear on the Homepage.
- You will also need to turn off the PDF, Print, Email icons as well as other elements that are normally displayed in the detail page of an article. To turn off these elements, you need to go to the “Page Interface” section and click the “Edit page layout” button.

You will enter a screen that shows the sections of your web page. Go to the “Center” section and click on “UC_OnePage”. This element will become orange and an “Edit” button will appear. Click the “Edit” button. A small screen will appear.
Leave the first 2 boxes as is. In the “Detail Page Display” section, uncheck all the boxes in this table. Click “OK” to accept the changes. You will be back to the “Edit page layout”.
Click the “Save” button.
Finally, click the “Update” button of the category record.
- You have just changed the category so that it does not display unnecessary elements.
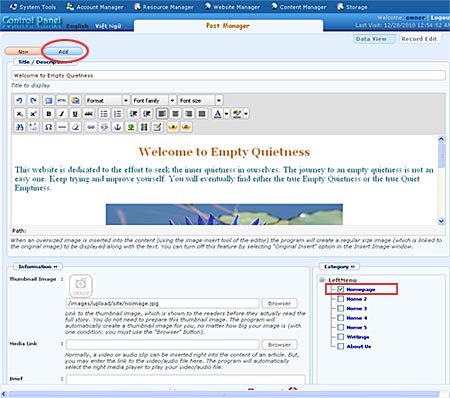
- Go to “Content Manager” on the Top Menu then click “Articles” in the list.
- Click “Record Edit” at the top right corner to start a new article.
- Title. FFill in a title. This title will not appear on the website because you have turned it off in the previous step.
- Category. In the category section, check the box on the same line with “Homepage".
- Now, let’s insert a table with 3 columns and 2 rows.
- Click the “Insert a new table” icon.

- A small screen will appear. You will fill these boxes like the following:
- Cols: 3
- Rows: 2
- Cellspacing: 12
- Alignment: “Center”
- Width: 760
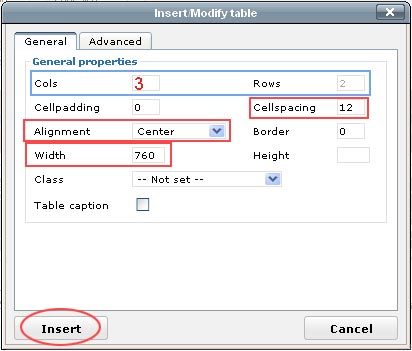
- Click “Insert” (or click “Update” if you are editing an existing table).

NOTE: The banner images you are inserting into the top cells should be as wide as the width of each cell. If the image is too wide, your table will look bad on the web page. In this example, the banner image should be 235 pixels wide.
- Click inside the upper left cell. Then, click the “Insert/edit Image” icon.
- The “Insert/Edit Image” will appear. Click the icon at the end of the “Image URL” box. You will see the files in your web server.
- Click “Article” on the left panel to enter this folder. You will load banner images to this folder because they belong to an article. Wait until you actually see the files in this folder.
- Click the “Upload” button at the upper right corner. You will see the files in your computer.
- Find the banner image and click on it.
- Click “OK”
- The “Insert/Edit Image” screen will reappear. The path to the image file has been filled in the “Image URL” box.
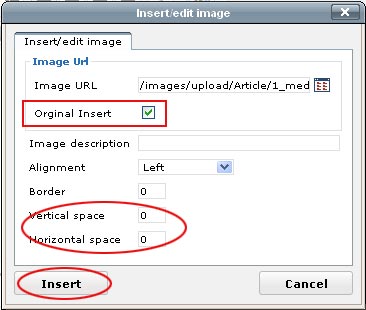
- Click to check the box on the same line with “Original Insert”.
- Enter “0” in the “Vertical Space” box.
- Enter “0” in the “Horizontal Space” box.
- Then, click “Insert”.
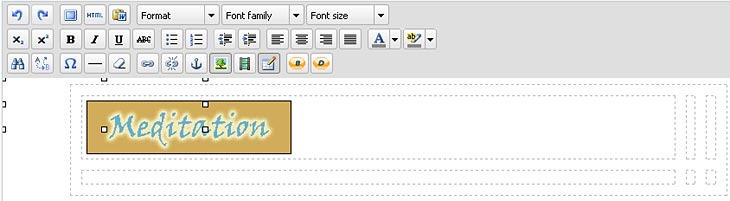
The banner will now appear in the first cell. Don’t worry if the table looks unbalanced. It will look OK after you’ve inserted all the three images.
- Next, insert the second banner image in the next cell. Repeat the steps you have just done.
- Continue to insert the third banner image. Repeat the steps you have just done.
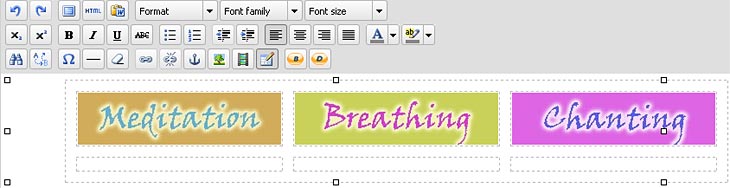
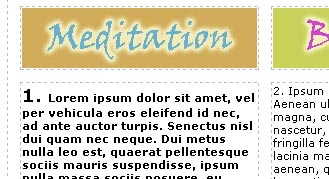
The “Description” box will look like this after the third image was inserted.
Next, you will insert text into the cells in the lower row. The “Description” will look like this after inserting the text.
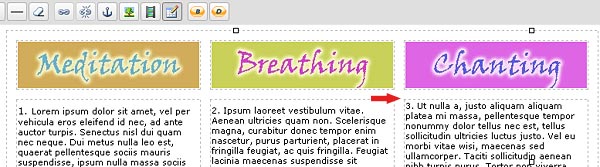
NOTE: If you look closely, you will find that the first line of text of the last cell does not align with those of the other two cells. The reason is: the three text blocks are not of equal length. We should align the first lines of these text blocks. Do as follow.
To align the text in these cells:
- Click anywhere in this text cell.
- Next, click the mouse’s right button. When a small list of tasks appears on the screen, you can release your finger.
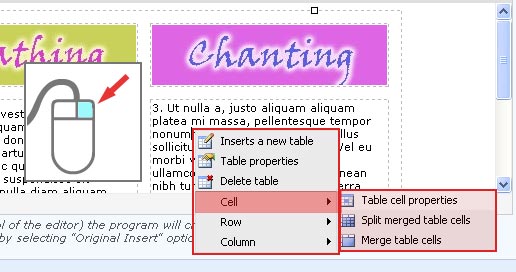
- Move the mouse cursor over the “Cell” line, another list will appear.
- Click on “Table cell properties”. You will see a screen with many options.
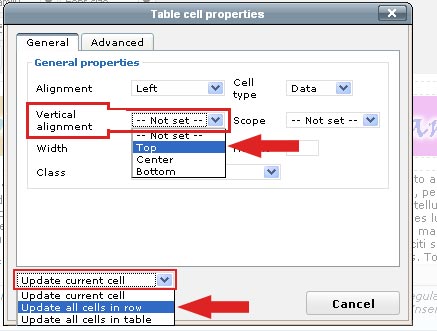
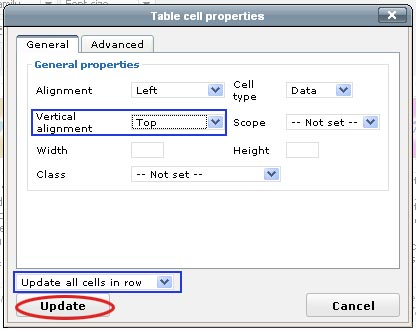
- Click the “Vertical alignment” box, then select “Top” in the list. This choice means the text will be aligned at the top.
- Next, you must apply this alignment to all the text blocks. Click the box near the bottom left corner which is showing “Update current cell” at this moment. Then, select “Update all cells in a row”.
- Finally, click the “Update” button to complete this task.
- Now, you want the text to be bold and the number at the start of each text block to be bigger than usual.
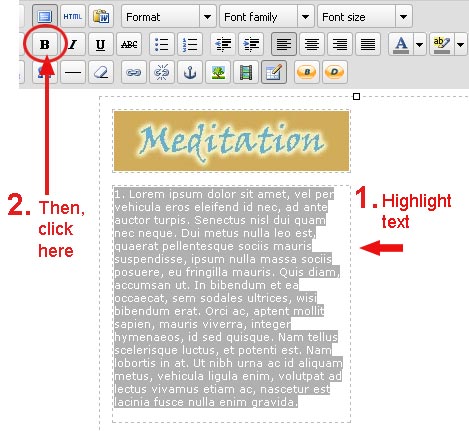
- Highlight the text in the cell, then click the “B” button in the editor’s tool box.
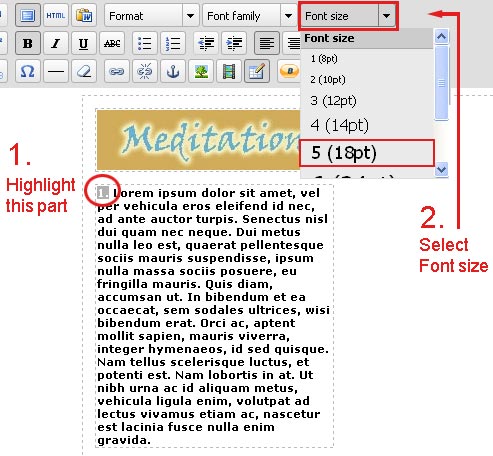
- Next, highlight the number at the beginning of the text. Click on “Font size” then select “18pt” in the drop down list.
- Repeat these steps for the other two cells.
- Finally, click the “Add” button of the record (or the “Update” button, if you are editing this record).
- Go to your website. Click “Homepage” on the Left Menu to check if the page looks the way you expected. You may need to go back to the article record to make necessary changes because you may have missed some details in process.
Until now, you have practiced doing some layouts for your Homepage.
%7Cutmcsr%3D(referral)%7Cutmcmd%3D(none)%3B%2B__utmv%3D936394114.-%3B)